Introduction to Ceramic Mold Casting for Metal
Ceramic mold casting is a precision Metal casting method. It produces parts with high dimensional accuracy and excellent surface detail. I recommend this process for aerospace, automotive, and jewelry industries. These sectors need detailed and reliable metal components.
Key Features of Ceramic Mold Casting
- Pattern Materials: Patterns shape the final casting. We make them from wax, plastic, rubber, or metal. These materials reflect the intended part design with precision.
- Ceramic Slurry Coating: We dip the pattern into a ceramic slurry. The slurry contains silica, zircon, or alumina mixed with a liquid binder. This step happens multiple times.
- Layering Process: After each dip, we coat the pattern with fine sand. Then we dry it. We repeat this cycle 6 to 8 times. This forms a strong ceramic shell.
- Drying Phase: The finished shell dries for 24–36 hours. This strengthens it for the next steps.
Ceramic Shell and Mold Preparation
De-waxing/Lost Wax Process: For wax patterns, we heat the shell in an autoclave or oven. The wax melts and flows out. We call this the lost wax process.
High-Temperature Firing: We fire the empty shell at around 1000°C (1832°F) in a furnace. This makes the shell solid. It removes remaining binders. It also increases the mold’s heat resistance.
Metal Pouring and Casting Attributes
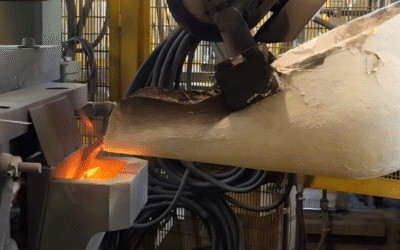
Versatile Metal Choices: We pour molten metals like steel, aluminum, bronze, or copper into the ceramic shell. The mold must handle the intense heat. It must also support the weight of these metals.
Final Casting Release: The metal cools and becomes solid. We break off the ceramic shell. This reveals a casting that shows every detail of the original pattern.
The process creates thin-walled structures and intricate shapes. I find it ideal for parts with undercuts or internal cavities. It works for metals with melting points up to 2000°C. Examples include titanium and superalloys. I’ve seen it used for turbine blades, engine components, and pump bodies. It also produces dental and medical prosthetics, jewelry, and art.
This method works best for small to medium batch sizes. We often produce several hundred pieces per run. Parts can range from a few grams up to several kilograms. Wall thicknesses can be as thin as 1.5 mm.
I believe ceramic mold casting stands out for producing accurate, complex, and strong metal components. Its unique qualities make it essential for industries that demand both precision and durability.

Creating the Pattern for Ceramic Mold Casting
An accurate pattern is the foundation of successful ceramic mold casting. This pattern defines the final shape, complexity, and surface quality of the metal part. Good planning and execution at this stage affect dimensional precision and casting outcomes.
Selecting Pattern Materials
Patterns are made from rubber, wood, plastic, or metal.
The choice depends on:
- Complexity of the part: detailed designs benefit from flexible materials like rubber or specialized plastics.
- Size of the casting: larger parts often use strong materials such as wood or metal for stability.
In my experience, choosing the right pattern material impacts production cost. It also affects how easy the mold-making process will be.
Designing the Pattern: Precision Considerations
Always include a shrinkage allowance when designing the pattern. Standard industry oversize is 1.3–2.5% to offset metal contraction after cooling.
Patterns should be a bit larger than the intended final part. For instance, if you need a 100 mm metal part, the pattern may need to be up to 102.5 mm before casting.
Taper (draft) is built into the side walls, often at a few degrees. This allows easy removal from the ceramic mold without damaging the edges.
Types of Patterns Used
- Solid Piece Pattern: Best for simple shapes and small castings. Quick to produce. Limited when creating complex forms.
- Multi-Piece Pattern: Used for detailed or intricate castings. Shapes or internal cavities can’t be released from the mold in one piece. These need precision alignment during setup for accuracy.
- Cope and Drag Pattern: Similar to match plate patterns, but crafted as separate top and bottom halves. Good for large-scale castings with complex features or heavy weights.
Pattern Features and Internal Geometry
If the final metal casting needs internal details—such as hollows or recesses—design the pattern to fit cores. Cores are often made on their own and positioned within the pattern before coating with ceramic slurry. Good pattern design ensures that these cores form accurate internal channels after metal casting. It prevents unwanted shifts or misalignments.
Real-World Practices and Advice
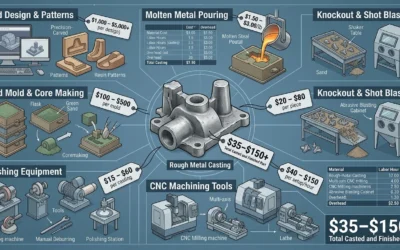
The initial cost for pattern creation varies based on material and complexity. It ranges from a few dollars for basic plastic templates up to several hundred dollars for large, precision-machined metal patterns.
I recommend investing time in the pattern stage. It reduces errors and remakes later. Accurate patterns lead to castings that meet tight tolerances and surface smoothness requirements.
Industries such as aerospace and jewelry often need custom patterns to produce thin-walled sections or intricate contours. This pushes the limits of material selection and design expertise. Based on my experience, a well-made pattern saves you money and time down the line.
Ceramic Slurry Application: Process and Composition for Mold Making
The ceramic slurry application stage forms a high-quality, durable mold shell for metal casting. This process affects the surface finish, strength, and size accuracy of the final metal part. I recommend paying close attention to each step to get the best results.
Ceramic Slurry Composition: Materials and Ratios
Key refractory materials: Silica (SiO₂), Zircon (ZrSiO₄ or ZrO₂), Alumina (Al₂O₃)
Common mixture ratios: 100% zircon, 50% zircon/50% alumina, 70% zircon/30% fused silica
Typical grain sizes:
- Zircon flour: 100 mesh, 300 mesh
- Alumina: 300 mesh
- Fused silica: 100 mesh
Binders: Commercial synthetic binders, often ethyl silicate. The binder burns out during firing. This reduces shell residue.
Gelling agents: These stabilize the slurry. They help the shell form with a uniform surface.
Composition guideline: 65% by weight denser refractory (e.g. zircon), 35% by weight coarser, lower-density material
Purpose of fine and coarse grades: Fine particles work best on initial coats for smooth finish; Coarser grades reduce shrinkage and improve shell strength
Ceramic Slurry Application Method
Application techniques:
- Immerse (dip) the pattern for full coverage and particle settlement
- Brush on slurry for small features or repairs
First coat:
- Use fine, dense slurry for uniformity
- Air-dry the pattern for 20–30 minutes. This sets the first layer and prevents air bubbles.
Layering process:
- Alternate dip and air dry steps. Each layer increases shell thickness.
- Between coats, sprinkle fine refractory powder or stucco to reinforce the surface
- Repeat until the shell reaches 6–7 mm thick for most applications
Key drying considerations: Air drying each layer is essential; You can speed up drying with fans, but control the process. Fast drying causes cracks.
Sealing coat: I suggest using this as the final step. It locks in loose particles and prevents flaking.
Total shell drying: Complete natural drying takes 6–7 days. This creates a strong, solid shell.

Optimizing Mold Strength and Surface Quality
Surface finish:
- Use fine grades for the first coat and coarser ones for later coats
- Achievable roughness for steel: Ra 2.1 μm with ideal process control
Final sand/primary coat: Fine ceramic sand or stucco on the last wet coat boosts durability. It also increases melt resistance.
Process controls: Agitate and settle the slurry for at least 1 minute. This makes dense, fine particles move to the pattern’s surface. This control of small structures reduces surface defects. It also improves size accuracy.
Quality inspection: After firing, check shells by eye. Measure them for accuracy and integrity.
Practical Tips and Enhancements
Use agitation and rest during slurry dipping. This ensures fine particle distribution across the surface. Avoid drying too fast. It prevents surface cracking.
You can adjust particle sizes and blend ratios based on your available materials. Just don’t sacrifice shell quality. For steel Investment casting, I recommend optimizing your slurry and firing process. This maximizes surface smoothness and part accuracy.
Ceramic Mold Slurry Application – Step-by-Step Summary
- Prepare slurry from chosen ceramic powders, binder, and additives
- Coat pattern: dip or brush, then air dry 20–30 min
- Add more coats with stucco or fine powder. Dry each layer.
- Repeat until you reach 6–7 mm shell thickness
- Add a sealing coat. Make sure the shell dries completely (6–7 days).
- Fire mold at 1100°C to remove pattern and harden ceramic shell
- Mold is now ready for high-temperature metal casting
Mold Preparation for Ceramic Shell Casting: Drying, Volatile Removal, and High-Temperature Firing
Good mold preparation is vital for strong ceramic mold shells in metal casting. I recommend focusing on three key stages: drying, removing volatiles, and high-temperature firing. These steps determine the mold’s strength, durability, and casting performance.
Controlled Drying of Ceramic Shell Molds
Ambient Drying Conditions: Place each coated shell in a controlled space with 30–40% relative humidity. Keep moderate airflow. Adjust for complex mold shapes to ensure even drying.
Drying Rate Monitoring: I suggest using the recovery temperature method. This uses embedded thermocouples to measure mold temperature versus ambient temperature at redipping. It helps you assess water removal. For example, a 1°F recovery temperature shows more thorough drying than a 6°F difference.
At 20% RH, drying to 1°F recovery removes much more water than at 50% RH.
Stage-wise Drying:
- Constant Rate Stage: Water evaporates as the shell shrinks. This continues to about 30% water by volume.
- Falling Rate Stage: Evaporation slows after reaching critical moisture content. Make sure shrinkage is finished before adding more shell layers. This enhances stability.
Visual Indicators: I recommend using dryness-indicating dyes in the slurry. They change color from yellow-green to orange-yellow at about 17% water remaining. Note that visibility can depend on refractory material color.
advanced Drying for Complicated Shapes: Increase airflow up to 2,000 ft/min for deep and narrow mold features. For tight or intricate designs, I suggest vacuum-assisted drying. Apply vacuum from 760 Torr to 1 Torr within ~9 minutes after a brief 15-minute initial air drying. This reduces the wax pattern temperature by about 5.5°F for compatible slurries.
Practical Production Considerations: Always track airflow, humidity, and temperature. Adjust based on part geometry. This prevents uneven drying. Uneven drying leads to cracks or weak spots.
Volatile Removal Process
Oven or Flame Drying: Finalize volatile removal using a low-temperature oven. Keep it below the point where wax melts. Or use a focused flame torch for targeted drying. This ensures you eliminate residual binders and moisture without damaging the wax pattern.
High-Temperature Firing for Shell Hardening
Firing Temperature: Heat the dried ceramic shell to around 1000°C (1832°F). This step is critical. It burns out any remaining binders. It fuses ceramic particles into a rigid structure.
Firing Procedure:
- Slow Heating: Raise furnace temperature slowly. This avoids thermal shock or shell cracking.
- Soaking Period: Hold at peak temperature for 1 to 4 hours. Duration depends on shell thickness and size. This ensures complete burnout and sintering.
Purpose and Results: This process removes all organics. It locks in moisture removal. It develops the shell’s final mechanical strength for the intense demands of metal pouring.
Industrial Practice: Investment casting involves placing dried molds within a high-temperature kiln for the prescribed firing schedule. After this, the shell is ready for wax burnout (if not already completed) and metal casting stages.
Based on my experience, careful control of drying and firing conditions produces strong, reliable ceramic molds. These molds are ideal for precision metal casting. They are essential for aerospace, jewelry, and similar demanding industries. I recommend following these steps closely to achieve the best results.
Assembling the Mold and Casting
Assembling the ceramic mold for metal casting is a precise process. I believe this process has a major impact on the quality and accuracy of your final product. Proper alignment and preparation are essential for success. This is true in industrial and high-value applications.
Mold Assembly: Aligning and Reinforcing
The ceramic mold is built in two main sections: the cope (top half) and the drag (bottom half). Align and join these two pieces with care. Misalignment leads to casting defects. It also causes poor dimensional accuracy.
For larger or complex shapes, I recommend using fireclay or refractory material around the outside of the mold. This adds strength and stability. It makes the mold safer to handle during casting.
Check all seams and sealing surfaces. Gaps or misfits may result in metal leakage. They can also cause flash during pouring.
Preheating the Assembled Mold
Preheating is a critical step. This is true when you cast metals with high pouring temperatures like steel or bronze. Preheat temperatures range from 700°C to 1000°C (1292°F–1832°F). This reduces the risk of thermal shock. It also prevents cracking in the ceramic shell.
A hot mold improves metal flow. It reduces defects. Preheat the mold in a furnace or oven. Some operations remove the mold and pour right away. Others allow a controlled cool-down to reach the optimal casting temperature.
Metal Pouring Process
- Prepare the molten metal: Heat the metal in a crucible or furnace to the required pouring temperature:
- Aluminum: about 660°C (1220°F)
- Bronze: about 950°C (1742°F)
- Steel: often over 1370°C (2500°F)
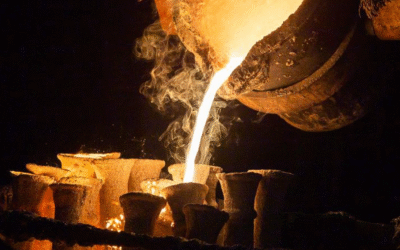
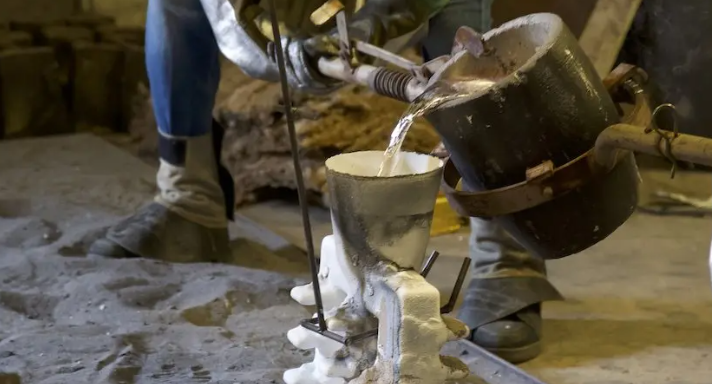
Pour the molten metal into the ceramic mold cavity through the sprue and gating system. For small castings, one person can manage the pour. For larger castings, use a team and mechanical lifting aids. The weight and extreme heat require this.
Always use heat-resistant clothing, insulated gloves, and face protection. Have chemical fire extinguishers on hand. This is part of standard safety protocol.
Maintain steady, controlled pouring. This prevents turbulence, voids, or incomplete fillings. Pouring too slow or too fast causes surface or internal defects.
Cooling and Shell Removal
After pouring, leave the mold and metal undisturbed. Allow them to cool and solidify. Small castings may solidify in minutes. Large or heavy castings can require several hours. This depends on the alloy and thermal mass.
Ceramic shell thickness for robust casting is 5–10 mm. Industrial-quality molds achieve tight tolerances. These are often within ±0.13 mm (±0.005 in) for small parts.
After solidification, break away the ceramic shell. You can use mechanical methods or water quenching. This reveals the finished casting.
Operational Tips and Real-World Examples
Rigid alignment and sealing of mold sections is essential. This avoids leaks and ensures sharp detail.
In the Shaw process, molds may be heated by torch or furnace to a red glow. Sometimes they are cooled before final assembly and pouring. This prevents shell cracking.
Preheating molds to around 1000°C is common for large steel castings. This results in fewer internal stresses. It also provides better surface quality. I have seen this process used for aluminum engine components and precision bronze sculptures. Detail and dimensional accuracy are critical in these cases.
Key Points for Success
- Monitor mold assembly and sealing with care.
- Maintain precise preheat and pouring temperatures.
- Pour with consistent speed. Protect against hazards.
- Allow full cooling. Then remove the ceramic shell to uncover high-quality metal castings.
Based on my experience, this approach ensures excellent results in ceramic mold casting. It minimizes defects. It delivers strong, detailed metal parts for demanding applications.
Removing the Casting: Methods for Separating Metal from Ceramic Molds
After ceramic mold casting, the removal process is critical. It preserves surface finish, microstructure, and part integrity. The right removal method depends on casting size, material, and precision needs.
Cooling and Solidification Control
Do not rush removal. Wait for full solidification. This prevents embrittlement or unwanted phase changes. For example, premature removal can turn Ductile Iron into brittle martensite. Foundries often use visual cues (like color change in iron). They also calculate pull times by geometry and alloy.
Ceramic Mold Removal Techniques
Manual Break-Away
- Best for small or simple castings
- Use hammers, chisels, or tongs to break off the ceramic shell. Then peel it away.
- Typical for art bronze castings and low-volume parts.
Mechanical Fracturing
- Used in industrial settings or for complex shapes.
- Strike or tap at key locations. Pneumatic hammers work well here.
- Caution: This can damage fragile or thin-walled castings.
Agitation/Vibration Tables
- Effective for high-volume and larger automotive parts.
- The mold is shaken. This helps the brittle ceramic shell crack and detach.
High-Pressure Water Jets
- I recommend this for investment castings and delicate geometries.
- Water jets (several thousand psi) strip away the ceramic. They do not harm metal surfaces.
Chemical Dissolution
- Essential for superalloy and detailed aerospace parts.
- Baths of concentrated hydrofluoric acid (48–70% HF, exposure 15–30 minutes) dissolve the ceramic binder.
- This reduces risk to thin sections. It leaves sensitive micro-features intact.
- Finish with a rinse of mixed acids and abrasive blasting. This removes any final residue.
Real-World Examples
- Superalloy turbine blades: Use HF acid baths for delicate shell removal. This preserves micro-precision.
- Automotive iron castings: Vibration tables combined with manual tools allow fast shell removal in production runs.
- Fine art bronze: Small-scale break-out using basic hand tools is common. Best for unique or limited pieces.
Casting Removal Checklist
- Confirm full metal solidification by color, geometry, or time.
- Match removal method to part type: manual, mechanical, water jet, or chemical.
- Clean residue with abrasive blast or acid as needed.
- Inspect each casting for cracks, residue, or damage before finishing.
Based on my experience, proper removal of ceramic molds affects surface quality and dimensional precision. I suggest choosing the correct process. It increases production efficiency and preserves the final product’s value.