Overview of Metal Casting
Metal casting is a manufacturing process that has existed for centuries. Molten metal is poured into a mold. It then solidifies into a designed shape. This method dates back over 6,000 years. The earliest known example is a bronze frog from Mesopotamia (~3,200 BC). Today, the global metal casting industry is valued at $50 billion. This reflects its significance across various sectors.
Key Principles and Processes
Pattern Making: A pattern is crafted as an enlarged replica of the desired object. It’s made 1–2% bigger to account for metal shrinkage during cooling. Modern tools like CNC machines and 3D printers ensure precise patterns. Based on my experience, investing in quality pattern-making equipment pays off in the long run.
Mold and Core Creation: The pattern forms a negative impression in the mold. Cores are often made of sand or metal. They create internal features such as hollow passages in engine blocks or pipe fittings. Molds can be single-use (expendable, as in greensand casting). Or they can be reusable (permanent, as in metal molds). I recommend permanent molds for high-volume production runs.
Metal Selection and Melting: Popular metals include steel, aluminum, copper, magnesium, zinc, and stainless steel. The metal is melted using basic furnaces or advanced induction systems. Impurities are removed before pouring. I suggest choosing your metal based on the final product’s strength requirements and budget.
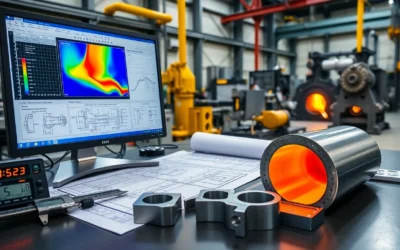
Pouring and Solidification: Molten metal is poured into the prepared mold through designed channels. This avoids defects like porosity. Advanced solidification techniques improve the metal’s structure. Grain refinement and controlled nucleation boost mechanical strength. I find that proper pouring temperature control makes a significant difference in final product quality.
Shakeout and Finishing: Once the metal solidifies, the mold (if expendable) is removed. The casting is cleaned and finished. It may be machined to achieve the required specifications. Excess material, like gates and risers, is trimmed away. Polishing or heat treatment follows. In my view, this finishing stage is where craftsmanship truly shows.
Applications and Industry Impact
Metal casting is used for mass production. It allows thousands of identical parts to be created. Automotive and machine components are common examples. This process delivers both speed and consistency.
Certain casting techniques work best for specific needs. Die casting is ideal for producing complex non-ferrous parts in large quantities. Greensand casting supports single runs. I like greensand casting for prototype development and small batches.
The process supports advanced engineering needs. Aerospace, medical device, and heavy machinery sectors rely on it. Precision and material performance are critical in these fields. I’ve seen how metal casting enables innovation in medical implants and aircraft components.
Mastering each step is essential. Creating an exact pattern matters. Careful metal selection makes a difference. Proper mold design is crucial. Manufacturers who excel at these steps achieve intricate shapes. They deliver outstanding material properties. They work at scale with the efficiency modern industry demands. From my perspective, metal casting remains one of the most versatile and cost-effective manufacturing methods available today.
Step-by-Step Metal Casting Process
Pattern Creation
Every casting starts with a pattern. This is a detailed model of the final part. We craft it a bit oversized (1–3%) to account for metal shrinkage as it cools. Modern techniques use CNC machining and 3D printing for accuracy and speed. For internal cavities or complex holes, we make cores (often sand or metal) using precise coreboxes.
Mold and Core Preparation
We use the pattern to create a mold. This forms the negative shape of the part. Based on production needs, molds can be:
– Expendable (like greensand or shell molds, destroyed after each use)
– Permanent (metal molds for high-volume runs and repeat casting)
I recommend including gates in your mold design to guide metal flow. Also add vents to let gases escape. Both are key for quality results and fewer defects.
Metal Selection and Melting
Common casting metals are steel, aluminum, copper, magnesium, zinc, and stainless steel. We melt the metal in a furnace (induction, crucible, or gas-fired). Temperature control is key here. It ensures proper flow and prevents defects like cold shuts or inclusions.
Example: Aluminum is poured at 660–750°C. Before pouring, we remove impurities using degassing techniques.
Pouring and Solidification
We pour molten metal into the mold. This can be done by hand ladle or automated system. Workers monitor pouring rate, angle, and temperature for even filling. This prevents shrinkage voids.
Once poured, the metal starts to harden. We manage the cooling rate to control crystal grain size. This affects the part’s strength.
– Feeders or risers in the mold compensate for shrinkage during this phase.
Shakeout and Casting Extraction
After cooling, we remove the mold.
– Sand molds are broken apart with vibration or mechanic assistance.
– Permanent molds open to release the part, often using ejector pins.
At this point, the casting still has excess runners, gates, and risers attached. It’s ready for post-processing.
Cleaning and Finishing
The casting goes through finishing to meet the final specs:
– Trimming: We remove gates and risers.
– Surface Treatment: Shot blasting, grinding, or chemical cleaning improves surface quality.
– Machining: We refine the part using CNC tools for precision.
– Heat Treatment: We apply this when extra hardness or flexibility is needed.
– Inspection: We check every piece using visual, X-ray, or ultrasonic methods. This ensures no internal or surface defects exist.
Sand Reclamation (in Sand Casting)
We collect, clean, and cool used sand for reuse. This lowers material costs and waste for foundries running repeat jobs.

Process Overview Table
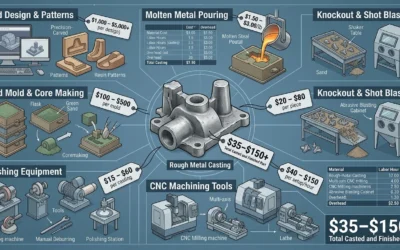
| Step | Actions & Key Data | Tools/Materials | Example Use Cases |
|---|---|---|---|
| Pattern Creation | Add shrinkage, create 3D models | Wood, plastics, CNC, 3D print | Automotive gears, engine blocks |
| Mold & Core Preparation | Form negative cavity, design gates/vents/cores | Sand, binders, coreboxes | Prototype development, mass runs |
| Melting | Heat, degas, control temp | Furnace, ladle | Die making, alloys |
| Pouring | Pour at correct temp, minimize defects | Ladle, pour system | Manual or robotic foundry lines |
| Solidification | Manage cooling/shrinkage | Mold, risers | Structural parts, housings |
| Shakeout & Extraction | Remove by breaking or opening | Vibration, ejector pins | Sand reclamation process, die casting |
| Cleaning & Finishing | Trim, blast, heat treat, inspect | CNC, blasters, measuring tools | High-performance machine parts |
Expert tip: Based on my experience, mastering each step is crucial. Pattern accuracy, proper metal selection, and smart mold design enable production of complex, high-strength parts at scale with minimal waste.
Core Steps in Metal Casting
Metal casting uses a clear, step-by-step process. This process makes exact copies of complex parts. I recommend following each phase closely. It helps you get reliable results, smooth surfaces, and fewer defects. Here are the main steps in metal casting:
Patternmaking
Use materials like wood, metal, plastic, or plaster. Create a precise pattern of the part you need. Make it 1–3% larger to handle metal shrinkage.
I suggest focusing on accuracy here. Any mistakes at this stage will show up in your final casting.
Molding
- Prepare the mold cavity with your pattern.
- Sand casting: Pack treated sand around the pattern. This method makes up ~60% of all castings worldwide.
- Investment casting: Make a wax pattern. Dip it in ceramic slurry and sand. Repeat this 6–8 times to build a shell.
- Your mold type affects both lead time and precision.
Coremaking (If You Need It)
Some designs have internal passages. For these, insert cores made from sand or metal. This creates hollow sections inside your casting.
Gating System Setup
- Design a gating system with a pouring cup and channels (gates).
- This controls how metal flows. It cuts down on turbulence and defects while you pour.
Pattern Removal
- Remove the pattern with care. This leaves a negative space in your sand or ceramic mold.
- This step protects mold detail and strength.
Melting
- Heat your chosen metal until it turns liquid. Most people use a furnace for this.
- Sand casting: Temps can hit 3,000°F (1649°C).
- You can process steel, aluminum, copper, iron, bronze, magnesium, and zinc.
- I recommend precise temperature control. It keeps alloy quality high.
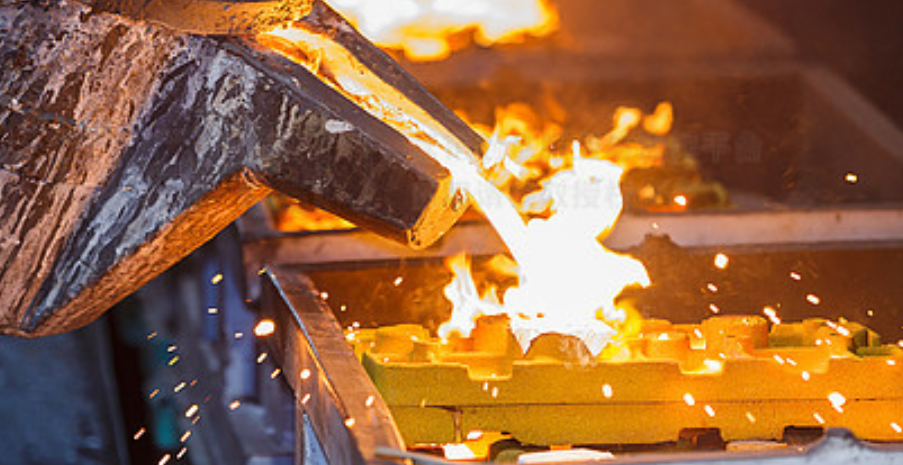
Pouring Molten Metal
- Pour molten metal into the mold. Control the temperature, rate, and angle.
- This fills the mold completely. It reduces cold shuts and voids.
Cooling and Solidification
- Let the metal cool and turn solid. Controlled cooling makes grain structure better. It also boosts mechanical strength.
- Time for solidification changes based on metal type and casting size.
Shakeout and Cleaning
- Remove the casting after it solidifies.
- Break apart sand molds. Take off investment shells after curing at 1000°C (1832°F).
- Clean off sand, ceramic, and extra metal. Use chipping hammers, band saws, tumbling barrels, pressure washers, or air-blasters.
Heat Treatment and Inspection
- Use heat treatment if you need specific mechanical properties.
- Inspect your castings by eye. Or use X-ray, ultrasonic, or measuring tools. This confirms accuracy and clean surfaces.

Key Figures and Examples
Sand Casting:
- Represents ~60% of all metal castings made worldwide.
- Six key steps: pattern placement, gating, pattern removal, pouring, cooling, mold breakage.
Investment Casting:
- Uses wax patterns and ceramic shells built up in 6–8 layers.
- Cured at 1000°C (1832°F). Shell drying takes 24–36 hours.
Melting Temperatures:
- Up to 3,000°F (1649°C) for sand casting.
- 1000°C (1832°F) for ceramic shell curing.
My Experience: I’ve found that getting the first steps right makes all the difference. Focus on pattern and gating system design at the start. This means less finishing work later. You’ll see lower rejection rates. And you’ll produce great parts—whether you’re making a single prototype or thousands of units.
More on Casting Methods
Each metal casting process has its own benefits, uses, and costs. Here’s what you need to know about the main methods:
Main Metal Casting Methods
Die Casting
- Process: Molten metal is pushed into a steel mold under high pressure.
- Advantages: You get precise dimensions and smooth surfaces. It works great for complex shapes.
- Metals: Works best with aluminum, zinc, and magnesium alloys. These metals melt at lower temperatures.
- Applications: I see this used for car parts and appliance casings. It’s perfect when you need high volume and precision.
- Tooling Cost: The initial cost is high because you need custom steel dies. But for large production runs, it pays off.
Centrifugal Casting
- Process: The mold spins fast while you pour in molten metal.
- Outcome: This creates dense, uniform metal. It removes impurities well.
- Limitations: It works mainly for long, round shapes. Think pipes and bushings.
Continuous Casting
- Process: You pour metal into a water-cooled mold without stopping. It forms slabs or bars as it cools.
- Advantages: This method is efficient. It gives you consistent quality. I recommend it for mass production.
- Uses: It creates base stock for rolling and forging. It’s the standard for billets, tubes, and bars.
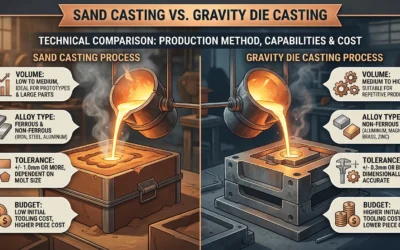
Gravity Die Casting
- Process: Gravity pulls molten metal into a metal mold.
- Benefits: It costs less than pressure die casting. Based on my experience, it’s ideal for smaller batches and medium parts.
- Applications: You’ll find this in kitchenware, light fixtures, and small car parts.
Shell Molding
- Process: You mix sand with resin. This forms a shell-shaped mold around a heated pattern.
- Quality: It gives precise dimensions and smooth surfaces. The tooling can cost more.
- Target Use: I suggest this for complex shapes that need smooth surfaces and high accuracy.
Lost-Foam Casting
- Process: You make a foam pattern that matches the final product. You surround it with sand. Hot metal vaporizes the foam and fills the space.
- Strengths: This is perfect for detailed shapes and thin walls. It’s good for prototypes or special parts.
Low Pressure Casting
- Process: Low-pressure air pushes molten metal up into a mold.
- Advantages: The metal fills smoothly. This creates strong parts without defects. The mechanical properties are better.
- Best For: I like this for high-stress parts like wheels and chassis components.
Investment Casting (Lost Wax Casting)
- Process: You coat a wax copy in ceramic. Then you melt out the wax. Molten metal goes into the ceramic shell.
- Highlights: It gives excellent detail and finish. You need minimal machining. You have great design freedom.
- Application: I see this in aerospace, medical tools, and precision industrial parts.
These casting methods open up many possibilities in metal manufacturing. Your choice depends on volume, material, complexity, budget, and final use. I suggest understanding these differences early. It helps you pick the most efficient and cost-effective process. This saves time and money on your project.
Summary
I’ve spent years in metal casting. Success comes from respecting each step.
The basics stay the same. It doesn’t matter if you’re making one prototype or starting full production.
Here’s what I recommend:
– Start with precise patterns
– Choose your materials with care
– Never rush the cooling phase
Master these basics. You’ll produce quality castings that meet tough industry standards. You’ll also keep costs under control.