Have you thought about making metal parts at home? I know custom pieces can cost a lot. A reusable mold helps you save money. It also gives you more creative freedom. Plus, you can make parts faster.
Step 1: Select Mold Material
Choosing the right mold material is a crucial step. I recommend you focus on this because it affects your mold’s life, cost, and part quality.
Common Reusable Mold Materials for Metal Casting
Steel Permanent Molds
- Used for gravity and low-pressure metal casting.
- Great for mass production. They can last up to 60,000 casting cycles.
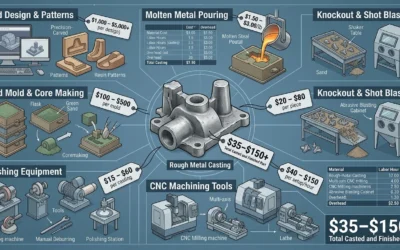
- Costs range from $10,000 to $90,000. This depends on part size and how complex it is.
- They give you tight tolerances. You get smooth finishes. They also have lower porosity than sand casting.
- Standard in automotive work, like engine blocks.
Cast Iron Molds
- Popular for gravity and die casting. Perfect for repeat cycles.
- They have strong heat transfer. They resist warping and wear well.
- Used for ferrous and non-ferrous metals. You’ll see them in automotive and machinery parts.
Graphite Molds
- I suggest graphite when you need precision and repeatability. Great for smooth surface finishes.
- Common in jewelry and precious metal casting (aluminum, gold, silver).
- Known for good heat transfer and resistance to thermal shock.
- Suitable for medium-to-high-volume runs. Molds often last hundreds of cycles.
- Cost-effective for small precision parts.
Ceramic Molds
Best for Investment casting that needs fine detail. They resist extreme heat well. They barely expand when heated. Aerospace and medical industries choose these. Think of complex thin-walled parts like turbine blades.
Metal Alloys
- Tool steels and nickel alloys work for tough casting conditions. They resist erosion and heat cracks.
- Pick an alloy that matches your poured metal and how long you want the mold to last.
Key Factors in Mold Material Selection
- Thermal Stability: Your mold must handle molten metal temps. Over 700°C for aluminum. Up to 1,200°C for steel.
- Dimensional Stability: The mold must keep its exact shape through thousands of cycles. This gives you consistent quality.
- Surface Finish & Precision: Steel, graphite, and ceramic give smoother finishes. Sand molds can’t match this.
- Production Volume: Based on my experience, permanent molds make sense for larger runs. They lower your cost per part. Yes, you pay more upfront.
- Cost vs. Longevity: Permanent molds cost more at the start. But they last longer and give better results. Sand molds are cheaper at first ($6,000–$20,000). But they’re single-use. They don’t offer the same precision or efficiency.
Practical Example Applications
- Steel: I like steel for automotive engine blocks. You need repeat production at high volume.
- Graphite: I recommend graphite for small jewelry parts or precious metals. You need repeat accuracy and finish.
- Ceramic: Chosen for aerospace turbine blades. These have complex, thin-walled shapes.
Summary Table: Reusable Mold Materials
| Material | Characteristics | Example Use Cases |
|---|---|---|
| Steel | High temperature, mass production | Automotive parts, engine blocks |
| Cast Iron | Durable, thermal efficiency | Machinery, non-ferrous metals |
| Graphite | Precision, good repeat use | Jewelry, precious metals |
| Ceramic | Holds detail, high temp | Aerospace, medical |
| Special Alloys | Custom resistance properties | Demanding/high-wear castings |
Step 2: Create the Master Pattern
The master pattern is your original model. You’ll use it to make your reusable mold. The design must match your final casting’s shape and size. I recommend accounting for every detail. This includes shrinkage and machining space.
Key Design Considerations for Master Patterns
Shrinkage Allowance: Make patterns a bit larger. This offsets metal shrinkage as it cools. Here are typical shrinkage allowances (per foot):
- Cast iron: 1/10 to 5/32 inch
- Steel: 1/8 to 1.4 inch
- Aluminum: 1/16 to 5/32 inch
Draft Angles: Add a small taper to vertical surfaces. Most patterns use 1°–3° per side. This helps you remove the pattern from the mold. You won’t damage the mold or pattern.
Core Prints: Does your casting have hollow sections? Then add projections to your pattern. These support and position the internal cores during casting.
Machining Allowance: Add extra material to surfaces you’ll machine later. Most patterns need 1/16 to 1/4 inch or more. This ensures your final part meets exact size needs after you finish it.
Gating and Riser Systems: Some patterns have built-in channels. We call these gates and risers. They create paths for molten metal to flow and feed as it hardens.
Types of Master Patterns
-
Flat Back Patterns: I use these for simple, one-sided castings.
-
Split Patterns: You build these in two or more parts. They work well for complex shapes. They’re also easier to remove from molds.
-
Match Plate Patterns: These have pattern halves attached to opposite sides of a plate. I recommend them for mass production of precise castings. Think automotive engine blocks.
-
Sweep Patterns: A form rotates around a center. This makes large, round parts that are symmetrical.
-
Segmented Patterns: You build these in sections. They work great for large or detailed castings. They’re easier to handle. They also last longer.
Materials for Making Patterns
Wood: It’s cheap and easy to shape. Good for short production runs. But it can wear out or warp with use.
Metal (Aluminum, Brass, Iron): These cost more at first. But they’re perfect for high-volume runs. Metal patterns are precise. They’re also durable.
Plastic and Resins: Based on my experience, these give the best stability. They resist wear well. They also offer excellent size accuracy.
Pattern Design Challenges
-
Accuracy: You must calculate allowances precisely. This includes shrinkage, machining, and draft. Mistakes lead to casting defects. You might have to reject parts.
-
Surface Finish: Make your master pattern as smooth as possible. A smoother pattern means a finer finish on your cast part.
-
Time & Skill: Pattern making takes the most time. It needs careful engineering math. It also needs skilled hands. Both ensure a quality casting.
I believe a well-designed master pattern is the base for quality Metal casting. Spend time and care here. You’ll save money and avoid problems later in production.
Step 3: Build the Mold Box
You need a strong, reusable mold box for quality metal casting. I recommend focusing on three key factors: material choice, size, and how you put it together. These will shape your results. Here’s my approach:
Choosing Mold Box Materials
Steel Alloy or Copper-Based Alloy: I suggest these for permanent mold casting. They resist heat well and last longer.
Wood or Metal (for Sand casting): Sand casting uses flasks made from wood or metal. You split them into two parts: cope (top) and drag (bottom). This design lets you reuse them many times.
Typical Mold Box Dimensions
- Small flasks: 200 mm × 150 mm × 100 mm
- Large industrial flasks: 600 mm × 400 mm × 250 mm
- Wall thickness: 15–25 mm (steel), 20–40 mm (wood)
- Box size vs. pattern: Build the box at least 30–50 mm larger than your master pattern on every side. This gives space for sand or metal to flow.
Mold Box Construction Steps
-
Cutting Materials: Measure and cut your steel, copper alloy, or wood. Make cope and drag parts to match your size needs.
-
Frame Build: Secure corners with bolts or strong screws. I like to add angle brackets. They keep the box rigid over time.
-
Alignment Setup: Add locating pins to line up cope and drag flasks. This step is crucial. It gives you accurate molds every time you use them.
-
Heat Protection: For permanent molds, apply a heat-resistant inner coating. This helps release patterns and shields against heat damage.
-
Add Features: Design removable sides or split parts if you need to take out patterns. Add vent holes, risers, or handles. These make handling easier and help metal flow better.
Follow these steps and best practices. Your reusable metal casting mold box will give you accuracy, durability, and consistent quality. I’ve seen this approach work time and again.
Step 4: Use Mold Release and Prepare Surface
Using a mold release agent is a must for reusable metal casting molds. I recommend this step every time. It helps parts release easily. It protects the mold. It also gives you better surface quality on each casting.
Types of Mold Release Agents for Metal Casting
-
Chemical Agents: These include waxes, silicones, or synthetic materials. They create a barrier. Metal won’t stick to the mold.
-
Fluoropolymer-Based Agents (e.g., PTFE): People like these for metal and epoxy molds. They reduce sticking. They prevent thermal damage.
-
Polysiloxanes (Silicones): These are easy to use. They work well. Many foundries choose them as a standard option.
-
Custom Powder Blends: For better results, try blends with mica powder (5–15%), silica sol (7–15%), and perlite powder (20–35%). These blends improve insulation. They give you excellent surface finishes.
How to Use Mold Release: Best Practices
-
Clean the Mold Surface: Start by cleaning the mold well. Remove all dust, oil, or old residue. The new release agent needs a clean surface to work.
-
Even Application: Spray or brush a thin, even coat on all mold surfaces. I suggest spraying for consistent coverage. Hold the nozzle 8–12 inches from the surface.
-
Allow to Dry: Wait until the release agent dries before pouring molten metal. Wet spots cause defects or poor finishes.
-
Use Before Every Casting: Based on my experience, you should use the release agent before each cycle. Follow what the manufacturer tells you. This extends mold life. It makes demolding easy.
-
Monitor for Buildup: Check the mold often for residue buildup. Clean and reuse as needed. This keeps surface quality high. It prevents sticking.
Preparation Tips for the Mold Surface
-
Use release agents that match both the mold material (steel, iron, graphite, ceramic, etc.) and the casting metal. Compatibility matters.
-
Clean carefully before every use. I can’t stress this enough. Skip this step and dirt or misplaced agent will ruin the casting. It can damage the mold too.
Step 5: Mix and Pour Mold Material for Metal Casting
Mixing and pouring reusable mold materials is crucial. This step controls both mold quality and part detail. I recommend using the right method. It ensures your metal casting mold is strong, accurate, and durable.
Selecting and Measuring Mold Material
Choose Mold Material: I suggest using silicone rubber or urethane resin for most reusable molds. Both come as two liquid parts—a base and a curing agent.
Accurate Measurement:
- Follow the manufacturer’s mixing ratio. Most use 1:1 by volume or 100:10 by weight (base:catalyst).
- Precision matters: Even a small error will cause problems. Your mold may cure wrong or develop weak spots.
Mixing the Mold Compound
Rapid, Thorough Mixing:
- Mix both parts at a steady pace. Don’t rush too much. If you do, you’ll have unmixed resin. This causes ‘bleeding’ or uncured areas.
- Mixing times: 2–4 minutes (for fast-curing polyurethane resin). Work fast. Resins can start curing as soon as they’re mixed.
Mixing Equipment:
- Up to 100 ml: disposable cups & sticks.
- Over 500 ml: wide containers for easier blending.
Check for Heat: Some resins warm up as they cure. When the container feels warm, it’s time to pour.
Reducing and Managing Air Bubbles
Stir and Scrape: Mix at a steady pace to trap as little air as possible. Scrape down sides.
Let Rest or Use a Vacuum Chamber: After mixing, let the compound sit for 1–3 minutes. If possible, de-gas in a vacuum chamber to remove bubbles. Bubbles can ruin mold detail.
Pour in Thin Streams: Pour the liquid material from one corner. Let it flow over the master pattern. Thin streams help break bubbles.
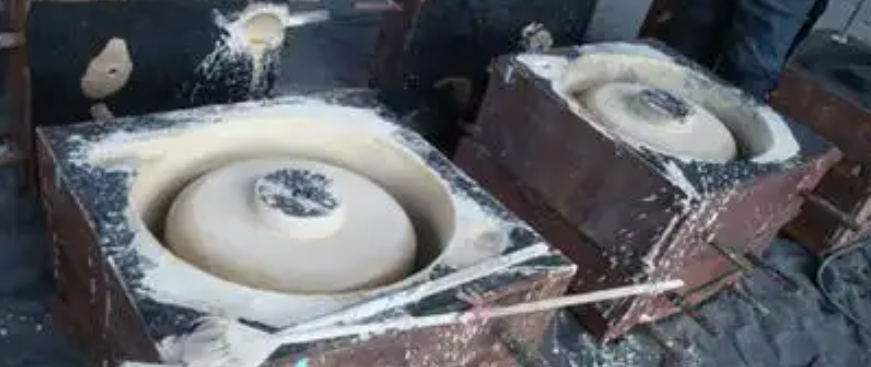
Pouring Into the Mold Box
Pour Over Master Pattern: Let the blend flow around and over your pattern.
Best Practice: I recommend pouring in one spot (a corner works best). Let the material “chase” air as it fills the mold. This improves surface detail.
For Sand Casting: Fill the flask with well-prepared molding sand. Pack it firm but not too hard. Create small vent holes for gases to escape.
Curing and Setting
Allow Full Cure:
- Typical pot life for silicone: 10–20 min; full cure 1–4 hours (room temperature).
- Urethane resin can cure faster: 15–30 min.
Do Not Demold Too Soon: Incomplete curing can ruin details. It also lowers strength.
Quantities, Timing, and Data
| Mold Project | Typical Pour Volume | Working Time | Cure Time |
|---|---|---|---|
| Small jewelry piece | 80–120 ml | 2–4 min | 15–60 min |
| Large figurine | 350–500 ml | 10–20 min | 1–4 hr |
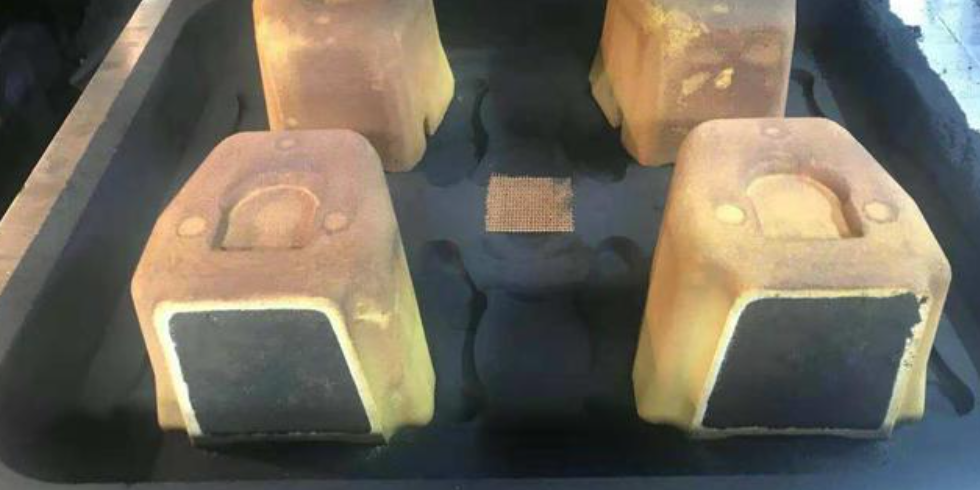
| Full brick-size mold | 1,200–1,400 ml | 10–20 min | 1–4 hr |
Step 6: Cure and Demold – Timing, Techniques & Best Practices
Curing and demolding are crucial in reusable mold making for metal casting. This step decides the mold’s final strength and detail. Follow the right process. You will get consistent, high-quality results. You will save costs. Your mold will last longer.
Curing Process for Reusable Molds
Optimal Cure Times and Temperatures:
- Most silicone molds cure at room temperature within 1–4 hours.
- Urethane resin molds set faster. They need just 15–30 minutes for a full cure.
- For industrial high-strength applications, some molds need post-curing at 60–80°C (140–176°F) for 2–6 hours. This step increases durability. It also boosts heat resistance.
Pot Life Data: Always check the manufacturer’s datasheet for pot life. Pot life is the safe working time after mixing. For silicone, this is 10–20 minutes. For urethane resin, it is 2–4 minutes.
Cure Quality Check: The mold surface will change from tacky to firm and flexible. For precision parts, press a corner with light pressure. There should be no sticky residue or permanent dents.
Demolding Techniques for Reusable Metal Casting Molds
Gentle Mold Release:
- Once cured, separate the mold from the master pattern. Start from the corners and edges.
- Use plastic wedges or wooden tools. Avoid anything metal. Metal can damage the mold surface.
Handling Large or Deep Parts: For big molds, flex the mold or use compressed air. This helps release the pattern in an even way.
Industrial Demolding Practices:
- Use split mold designs for complex or deep undercut castings.
- Add demolding taps or integrated handles during the mold box build. Large molds become easier to remove. They won’t tear.
Industrial Examples and Personal Insights
Jewelry Casting: For small, high-precision silicone molds (e.g., rings or pendants), a room temperature cure of 1 hour is enough. I suggest curing in a controlled environment. This ensures best results.
Automotive and Machinery Molds:
- Reusable steel or graphite molds need post-curing under heated conditions. This ensures dimensional stability. It also creates a perfect demold.
- Demolding hardware (taps, split lines) is built in during tooling. Initial cost is higher ($1,500–$8,000). But cycle life exceeds 5,000–30,000 parts.
Based on my experience, investing enough time in curing prevents 90% of demolding issues and scrap. I recommend using purpose-made release agents. Follow exact curing schedules. This extends mold life. It also gives the best surface finish.
Step 7: Cut Gates and Vents for Metal Casting Molds
Cutting gates and vents is a critical step. It ensures smooth metal flow. It also releases trapped gases in reusable metal casting molds. Proper gate and vent design can improve casting quality. It reduces defects. Here’s how I recommend doing it:
Gate Design for Efficient Metal Flow
What Are Gates? Gates are channels. They guide molten metal from the runner (a main channel) into the mold cavity.
Cutting the Gate: After taking out the master pattern, use a gate cutter. This is a piece of bent sheet metal. Cut the gate in the parting surface.
Size Matters: The gate should be three times larger in area than the runner or sprue. A larger gate slows down the metal’s forward movement. It keeps the flow consistent. This reduces turbulence. It prevents casting problems.
Metal Velocity Recommendations: I suggest keeping metal speed at the gate below 1 meter per second (Professor Campbell’s guideline). Aim for 0.5 m/s (20 inches/sec) for best results. Slower metal reduces splashing. It reduces turbulence. It lowers the risk of defects.
Types of gating systems:
- Vertical gating: Metal enters the mold from above. Gravity and airflow drive it.
- Bottom gating: Metal fills the mold from the bottom. This reduces oxidation. It minimizes splashing.
- Horizontal gating: Sideways channels distribute molten metal. This works well for complex or long parts.
Venting: Letting Air and Gas Escape
Purpose of Vents: Vents allow air and gases to escape as the mold fills with metal. Without them, gases get trapped. This can cause porosity, misruns, or surface flaws.
How to Add Vents:
- Use fine wires or rods. I recommend 14-gauge copper wire. Create vent holes at the highest points of the mold cavity.
- Press the wire through until it just touches the pattern underneath.
- Standard vent size: 1–2 mm in diameter. It should run all the way to the outside of the mold.
- Remove the wires after forming the passage.
Why Vent Placement Matters: Place vents where gases escape best. Focus on the mold cavity’s uppermost locations. Include intricate details.
Typical Cutting Steps
- After Pattern Removal: Cut runners and gates into the mold’s parting surface. Use your gate cutter tool.
- Plan your Vent Locations: Find high points and complex areas. Insert wires to create small air channels.
- Remove the Tools: Take out any wires or rods before closing the mold. This allows metal to fill in evenly.
Caution:
- Gates that are too large can be hard to remove from the final casting.
- Vents that do not reach the cavity may trap gases. Vents that don’t extend out enough cause defects.
Step 8: Assemble and Preheat the Mold (Metal Molds)
You need to assemble and preheat metal molds correctly for high-quality casting. Based on my experience, these two steps help your molds last longer. They improve casting quality. They reduce defects.
Mold Assembly for Metal Casting
Inspect Components: Check all mold pieces for cracks, wear, or misalignment. I recommend inspecting cooling channels too. Make sure they’re clear. Blocked channels cause casting defects.
Apply Mold Coating: Before you put the mold together, brush on a thin layer of ceramic or graphite coating. This coating helps you release parts easier after casting. It also extends mold life.
Assemble with Precision: Align the two mold halves. Use strong alignment pins and heavy-duty clamps or bolts. You need a tight, uniform seal to stop metal leaks.
If your part needs internal cavities, insert cores (iron, steel, or sand) at this stage.
Uniform Heating and Quality Control
Hold Time: Keep the mold at target temperature for 30–120 minutes. Thick walls (>20 mm) or complex shapes need longer hold times. Wait until all points are within 10°C of each other.
Real-World Performance:
- One aerospace plant used induction to preheat wing bracket molds to 260°C. This cut hot tearing by 30%. It raised part yield strength by 10%.
- An automotive foundry preheated steel engine block molds to 240°C with resistance heating. They achieved 15% lower porosity. The surface finish was much smoother.
I believe proper metal mold preheating and assembly give you better mold life. They reduce the risk of cracking. They improve metal flow. You’ll get fewer casting defects—from porosity to hot tears—no matter what metal you cast.
Step 9: Use Mold for Casting Metal – Processes, Safety, and Optimization
Using a reusable mold the right way is key to getting consistent, high-quality metal castings. It also helps your mold last longer. This step turns your careful prep work into finished metal parts. Here’s how I do it:
Preparing the Mold for Metal Casting
Confirm Mold Cleanliness: I always start by checking the mold cavity. Make sure it’s free of dust, old metal bits, or residue. Even one tiny particle can ruin your next casting or damage the mold.
Secure Assembly: Align all reusable mold parts. Then clamp them tight. Use heavy-duty fasteners or clamps for metal molds. A stable seal stops metal leaks. It also prevents mis-shaped castings.
Add Release Agent: Before every pour, I add a high-temperature release agent inside the cavity. Use spray or graphite-based types. This simple step extends the mold’s life. It also makes removing finished parts easier.
Melting and Pouring Metal
Choose the Right Alloy: Select molten metal based on your mold’s material and its temperature limits:
- Tin (~232°C / 449°F)
- Aluminum (~660°C / 1220°F)
- Copper (~1085°C / 1985°F)
- Zinc or appropriate alloys also work well for reusable molds.
Melt Metal with Care: Use a crucible and a heat source designed for the metal you chose. I suggest melting in small, controlled batches. This avoids overheating or oxidation.
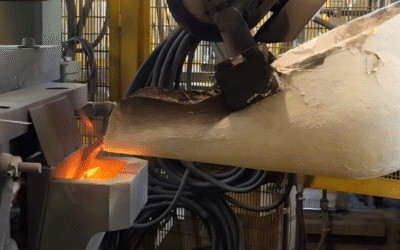
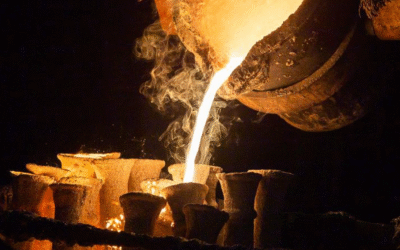
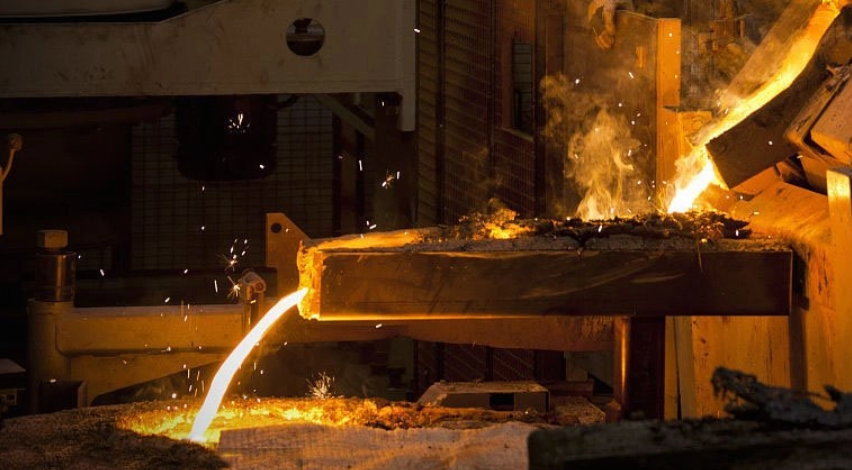
Pour with Control: Pour the molten metal in a smooth, even stream into the mold’s sprue or inlet. Avoid splashing. This limits air bubbles and oxidation.
- Personal Safety: Wear PPE—insulated gloves, face shield, safety goggles, and flame-resistant clothing. I always keep a chemical fire extinguisher nearby.
Cooling, Solidification, and Extraction
Allow Enough Cooling Time:
- Small castings: 10–30 minutes
- Large castings: 1 hour or more
For faster solidification or better grain structure, I recommend cooling with water channels. You can even use direct water quenching if the alloy allows.
Demold with Care: Once the metal is solid, open the mold with caution. Use ejector pins, a wooden mallet, or gentle tapping. Never force the mold open. Remove the casting without damaging the mold cavity.
Post-Casting Handling:
- Trim gates, runners, and sprues with a saw or clippers.
- File or grind excess material and flashes.
- Brush and clean off any mold release residue.
- Recycle trimmed metal in your next melt to boost efficiency.
Casting Methods with Reusable Molds
Permanent Mold Casting: This method uses gravity and molds of moderate complexity. It works well for uniform, medium-sized pieces. Think automotive parts.
Centrifugal Casting: The mold rotates during pouring. This is ideal for high-density shapes like pipes and rings.
- Case Reference: Pipe and pressure fittings often use this method. It gives a superior finish.
Die casting: Metal is injected at high pressure. This delivers complex parts with tight tolerances. Investment in strong machinery and harder alloys pays off. Based on my experience, you can get cycle lengths of 10,000+ castings.
Best Practice:
I’ve seen this in my own work and across the industry. The most successful foundries and hobbyists keep a strict cleaning, inspection, and re-coating cycle for their molds. This is what separates good results from great results.
Metal casting with reusable molds combines safety, repeatable steps, and smart maintenance. Follow these essentials to get better casting quality. You’ll also get more parts per mold and extend the life of your valuable equipment.